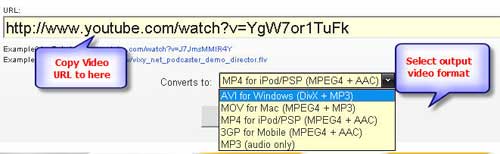
1. With free online flv converter such as http://vixy.net when you find your favorite youtube video, just copy the video URL (like this format http://www.youtube.com/watch?v=sdUUx5FdySs ) to the input box, choose the output format, and then click start. When the conversion finished, you will get the video download link, just download to your computer.
3. With free Youtube downloader & player
http://www.flash-on-tv.com/free-youtube-downloader.html
How to burn Youtube video to DVD disc ?
As regular DVD burner software doesn't support Youtube video format (FLV), you have to find a program that can burn common video such as WMV (Windows Media Player), MP4 (iTunes), FLV (Youtube), etc to DVD disc. DVD Creator is one of the few DVD burner software that can get the job done. And this app can also burn MKV, AVI and M2TS and other HD video to DVD with real DVD menus. Here are a few steps about how to use this software:
Step 1: Download this DVD Creator, install it and start operation;
Meanwhile, you can insert DVD +R (DVD-R, DVD+RW or DVD-RW)
Step2: Run DVD Creator, add video files or load files which you want to convert;
One Way: Click the “Load files” to add video files;
Another way: Choose “Load video” option under the “file” drop-down menu, and you can add files as you want, too.

Step 3: Display the loaded file and choose the video you want to convert
Details:

When you are clicking the” Burn” button, here are some options for you as follows:
Burn to: you can burn your DVD to DVD, DVD Folder, or ISO file as you will; and then you should choose where you want to save the burning DVD files; next choose the TV Standard “NTSC or PLA”
Explanation: “NTSC” is 30 fps, which is used in USA, Canada and Japan. “PAL “is 25 fps, which is used in Europe and Asia. At last, choose the aspect ratio: 4:3 or 16:9

After above steps, now click the “Start” button to begin conversion.
Tips: if your video and the subtitle are separated into two files, this software may allow you to plug-in the subtitles for MKV files. Ok, just follow the steps below;
1. Drag the loaded video to the storyboard.
2. Click the video, you may see the button “edit selected video file”.
3. Then click the button, a box that offers settings for the subtitle will appear. (you may also crop and trip your favorite parts off the video here.)


No comments:
Post a Comment